Tag Archives: Gary Hinze

Note from Gary

It looks like Eduardo has made great progress. As I went through the pictures, I was going to suggest he find a bigger place to fly, and he did.

Paulownia is another wood that is light, almost as light as balsa. It is widely available in the Orient. A tree of wider distribution is cottonwood. The roots are soft and light, similar to balsa, but very porous. Unfortunately also somewhat brittle.

His first prop was not spinning very freely. Prop bearings can be made of metal tube or coiled wire. Ball point pens are a good source of metal and plastic tube. Metal washers can be used, or glass beads, or solid plastic from food cartons. Cardboard saturated with varnish or similar material will hold its shape better.

The prop shaft must make a slight angle to the wing, 3 to 5 degrees. I set the wing position by glide testing with the motor on, doubled over if possible, but no turns, and moving the wing until it makes a slow, steady descent. Usually that works, but the Squirrel zoomed and the wing had to be moved backwards.

My Squirrel weighed 5.9 grams and I estimated it would fly with a 20″ loop of 1/16″ rubber. I must have given the 20″ motor to one of the kids and not replaced it. I flew it with 1,600 turns on a 14″ motor and it did 1:02 in the Gym, after zooming and hitting the floor a couple times and having the wing moved back. It will do better after some tuning.

Gary Hinze

Tiny Tom

Here’s a neat plane Gary sent me:

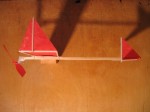
“This is an AMA Cub reduced in proportion to a 100 mm propeller and made of foam. It is too heavy to fly in the living room, which was the design goal. Neither Lou nor Michael have been able to get theirs flying. I know why. It is way too heavy. Mine is a couple grams lighter than theirs and it barely fits when everything is just right, but circles downward. More power spirals in faster. Left aileron roll levels the wings and climbs, but hits the wall. It is also hair’s breadth sensitive on the controls.

It has been a bit windy for outdoor flights. I want to get the tailplane incidence sorted out. I have some ideas on that and outdoor testing might work if the air is calm. Usually you can’t tell the results of an adjustment outdoors because what it does might have been a result of uneven air, not the adjustment.”

I asked:

Why is it so heavy? What does it weigh? What about cutting circles in the wings and cover the holes with tissue? What about scraping the propeller? What about a smaller stick?

He replies:

I have tables of weights of every part on each plane that I have made, both before and after construction.  Here is what I have for Tiny Thom:
Design weight estimate:
1.  0.020″ steel wire prop shaft            0.040 gram
2.  100 mm red plastic prop                0.717
3.  P-P prop hanger/bearing                0.180
4.  P-P motor hook                            0.046
5.  3 mm x 6 mm, 11# stick                0.620
6.  Depron wing                                 1.553
7.  Hold down spar, 11#                      0.117
8.  2 dental bands                              0.003
9.  Durobatics tailplane                       0.256
10.  Durobatics fin/rudder                    0.174
Total                                                  3.706 grams
Finished assemblies:
Propeller; 1, 2 and 3                            0.976 vs 0.937, 0.039 high
Wing; 6 and 7                                     1.909 vs 1.670, 0.239 high
Stick; 5, 8, 9 and 10                            1.086 vs 1.099 , 0.013 low
Total                                                   3.971 vs 3.706, 0.265 high
I used 0.025″ wire for the prop shaft.  The wing is overweight because the hold-down spar was more like 14# wood (0.148, adds 0.031) and there is a long, thick run of glue in the dihedral break/hold-down join (apparently about 0.208).
One of the design goals was simplicity.  Use of a built up T, I-beam or box is outside that goal.  I have another plane, the Moth, that comes in at 2.595 grams, does 21 3/4 circuits in 1:21.13 in the gym and has flown 7 1/2 circuits in 28 seconds inside the 11′ living room.
The only problem with this plane is that the 0.57 mm foam is a bit delicate for kids.
Have you seen the Ikara Butterfly and Kolibri?


Darcy: So if the Ikara Butterfly weighs less than 3g, and your Moth flies well at 2.595 grams, then assuming you have similar wing area on your Tiny Thom, I guess you need to loose like a gram.

Does that make sense?

How thick is that wing material? What if you cut triangles into it and covered with tissue triangles?

I wonder if there’s a way of getting a couple of 10ths off that motor stick.

Gary: Yes, losing a gram would help.

The wing is Depron foam that is 1.36 mm thick and weighs 6.97 gm/100 sqin. The foam in the Ikara Kolibri is 0.33 mm thick and weighs 3.65 gm/100 sqin. The tail is Durobatics foam that is 0.77 mm thick and weighs 2.35 gm/100 sqin, but is too flimsy for the wing. It is fuzzy on one side and soft, so it is hard to reliably measure its thickness. It is marginal on the tail. It works OK in the Moth because the moth has 8.3% camber that stiffens it. Kolibri foam would help, but would be used on the tail as well. There is another foam that is a little thicker that might be better in stiffness for this wing. The economies of the diecut process require that all surfaces be cut from the same sheet.

The intent of this design is that it be a quick clip together that a 10 year old can make in 5 minutes and then it will fly reliably in the house.

The motor stick could be thinner. The other guys are using 1/8″ square. (They call their plane “Wee Thomas”.) But that requires a nose block so the stick can fit in the prop bearing and there isn’t room for the tailplane taper.

I will be going over all the weights again tonight to see whether I can save enough to justify building another plane. I am thinking of a Moth with a 1/16″ x 1/8″ stick.

I just remembered, I can’t get the prop assembly any lighter. Or not by much, anyway. All the parts are off the shelf. I could scrape the prop a little, but that isn’t going to help much and we can’t expect kids to scrape a prop with a razor blade. That limits how much weight we can take off everything else. The wing is already jammed up against the prop hanger. Taking more weight off everything else will move the CG forward into dive location. It might be possible to take weight off the wing, add weight to the tail and have the whole thing lighter without moving the CG. That is a more complex calculation, might be worth doing. Then there is the problem that the production version is intended to use a heavy plastic wing clip, 1.1 gram itself, instead of the balsa stick and two dental rubber bands.

I think we have painted ourselves into a corner. I think we must start over.

1 minute flight

Here’s a video and some comments I got from Gary:

I have only the one video of the Squirrel. I didn’t get the whole 1:02, I was launching the plane in the first few seconds with the camera dangling from my wrist. I just looked at your one winglet stall video again and mine starts the same way; zooms, falls off, may hit the floor, may zoom again and fall off, eventually settles into a steady left circle. I prefer a slow, steady climb. It will do that with lower torque from a thinner motor. I think I have too much decalage. Question is , how much should it have? Tough to experiment. Each angle requires a new stick and tail assembly. I will build a separate tailplane unit and test different tail incidences with shims. The difficulty is that when trimmed for slow glide, it zooms, but when trimmed for power, it dives in the glide. It needs trim conditions where CG agrees in power and glide.

One winglet is easy to investigate. Make one of each wing and fly them. There is a lot going on with the winglet. We had a lengthy discussion about it. Position relative to CG, direction of lift vector, blanketing by wing, effect of winglet on wing lift, interaction with fin, on and on. You can discuss all you want, a simple test will give a definitive answer. In consideration of all the above, I now think the left winglet would be the more effective. It is more likely to produce a lift vector above the CG and is not blanketed by the wing. It does interfere with the flow around the wingtip a little. Or they could be about the same. I am not a fan of one winglet. I guess I have classical Greek aesthetic preference for symmetry. (Says the expert on asymmetric kites. Hmmm, wonder if I could get one of those asymmetric kites flying with a rubber band.)

I am building another airplane today, an AMA Cub reduced for a 100 mm prop, using foam for the flight surfaces. So far the guys have made them too heavy at 5.5 grams. Mine will be 3.7, still too much, but with lighter foam later it may be OK. So I won’t get back to the Squirrel until later. It’s just as well to give it time, the longer I think about it, the more ideas I have.

Gary

I answered:

I’m spending a lot of my time helping people so my hands are often too busy to get good videos. I’m glad I get cool videos from guys like you.

When I make my Squirrels, I just have the tail at zero degrees to centerline of stick.

I then use a shim as it’s much easier when I do workshops to keep the number of steps down for construction.

I think I will make a removable winglet and move it back and forth on the same model. That will give me better quality information.

I make them with removable winglets to fit in my briefcase. So I’ll just use one of those I guess and see what happens.

I will try and get some outdoor flying in tonight.

I am thinking that your wing is symmetrical except for the shim block. If the shim block could be on a separate wing mount, you could just turn the wing around. My wing is not symmetrical because the trailing edge is thinner than the leading edge. A removable winglet is a good idea, too. I might be able to do that with the plain wing I have. The weight of the left winglet will accelerate the left sideslip, another factor to consider.

I was thinking to break and reglue my plain wing to make dihedral. Better wait on that until I get to test removable winglets.

I find that the Squirrel uses so little material, I like to have a few flying. Especially for outdoor as they get damaged and I fix them over and over.

I will post a video of the folding removable winglets later so you can see how easy it is to get that working…

I was thinking a second rib just inside the tip with enough space to be a firm friction grip on the fin, the fin being another wing rib with the winglet spar and paper glued to it. Adds the weight of two wing ribs.

I tried that in I couldn’t get a good friction fit. The winglet kept popping off. Wait till you see the video of the pop up winglets. There is a picture I think in the news section but I can’t remember.

I’ll go take a video of my removable winglet system now. It will take an hour or so by the time I have a some rum and transfer my camera to my computer and upload it all to youtube but I’m sure you will like it.

12 minute Squirrel

I took the new Squirrel to the Gym tonight.  There weren’t many kids, so I had lots of time to fly planes.  I was planning to fly it on a 20″ loop of 1/16″, but the can was empty.  Must have given that motor to one of the kids last week.  I had just enough 1/16″ strip in the bag to make up a 14″ motor.  I wound it to 1,600 turns, just shy of 80%, for a test flight.  It had a serious power stall.  Picked it up, moved the wing back a bit and relaunched, it did 1:02.  Moved the wing back until the CG was at the leading edge and there was still a bit of a power stall, but it made several very nice flights.  I had calculated the motor should be 0.0595″ wide, so I guess I should strip some narrower stuff and try again.
Darcy shows some Squirrels with only one winglet.  I decided to try a wing without winglets.  It makes a beautiful illustration of a spiral dive; an accelerated tightening dive.  I suspect the right winglet is the preferred if you are going to have just one.
Gary Hinze

12 minute airplane

Hi Darcy,
Here are all the pictures I made.  Some of them are a little clearer on close up details than the one I sent to FFML.
This is the one I sent to FFML.  The tailplane spar appears to be canted because of the perspective; the camera is pointing right at the middle of the stick.
Close up of the front end showing nose block, wing mount, wing spars, CG mark.  With the paper on top, there is no need for the shim block.  The shim block gives 1.68 degrees of incidence to a -2 degree airfoil incidence, resulting in an effective -0.32 degrees incidence.  This arrangement gives 2 degrees incidence.  Add to those incidences the 3 degrees of down thrust to estimate attack angle.
Close up of the tail showing fin spar extension as rear rubber hook, tapered motor stick and both papers located at rear end of stick with fin extending 1/8″ beyond tailplane.  You can see the pencil mark for the end of the taper.  I have since filed a semicircular notch in the hook post just below the tailplane.  May not be necessary.
Bottom plan view showing smaller wing ribs and trailing edge.  Tight dental bands will keep the wing from flopping around.  This is a very light airplane.
It glides very nicely, turning left.  Too windy out to fly in the park.  I will be going over to the Gym this evening to teach and may get time to fly it indoors.  I have three other planes and several motors to test.
You should be able to get this one together in under 5 minutes.  I expect it will do a minute in the Gym.  No telling how long it will stay up outside.
Your site shows some with only one winglet.  I am going to build another wing with no winglets, see what happens.
This reminds me of some of the early rubber planes from the 1930’s.
Here is one I saw on eBay about a year ago.
The instructions were printed on the end of the box.  Men and boys were made of sterner stuff in those days.
January 1991 Model Aviation, page 35 has an article on building a “Baby ROG”.
This is my foot stooge.  3/4″ x 2 1/2″ x 5 1/2″ pine block, or whatever scrap you have handy.  Coat hanger wire hooks, all one piece of wire, threaded through two holes drilled 1″ from one end and 1/2″ apart, 1 1/2″ high, 1/2″ wide and 3/8″ deep.
Foot stooge in use.  Self explanatory.  I use a 10:1 winder because I am too stupid to count in 15’s.
Gary Hinze
San Jose, California