Hi Darcy,
Here are all the pictures I made. Some of them are a little clearer on close up details than the one I sent to FFML.

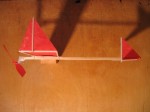
This is the one I sent to FFML. The tailplane spar appears to be canted because of the perspective; the camera is pointing right at the middle of the stick.

Close up of the front end showing nose block, wing mount, wing spars, CG mark. With the paper on top, there is no need for the shim block. The shim block gives 1.68 degrees of incidence to a -2 degree airfoil incidence, resulting in an effective -0.32 degrees incidence. This arrangement gives 2 degrees incidence. Add to those incidences the 3 degrees of down thrust to estimate attack angle.

Close up of the tail showing fin spar extension as rear rubber hook, tapered motor stick and both papers located at rear end of stick with fin extending 1/8″ beyond tailplane. You can see the pencil mark for the end of the taper. I have since filed a semicircular notch in the hook post just below the tailplane. May not be necessary.

Bottom plan view showing smaller wing ribs and trailing edge. Tight dental bands will keep the wing from flopping around. This is a very light airplane.
It glides very nicely, turning left. Too windy out to fly in the park. I will be going over to the Gym this evening to teach and may get time to fly it indoors. I have three other planes and several motors to test.
You should be able to get this one together in under 5 minutes. I expect it will do a minute in the Gym. No telling how long it will stay up outside.
Your site shows some with only one winglet. I am going to build another wing with no winglets, see what happens.
This reminds me of some of the early rubber planes from the 1930’s.

Here is one I saw on eBay about a year ago.

The instructions were printed on the end of the box. Men and boys were made of sterner stuff in those days.
January 1991 Model Aviation, page 35 has an article on building a “Baby ROG”.

This is my foot stooge. 3/4″ x 2 1/2″ x 5 1/2″ pine block, or whatever scrap you have handy. Coat hanger wire hooks, all one piece of wire, threaded through two holes drilled 1″ from one end and 1/2″ apart, 1 1/2″ high, 1/2″ wide and 3/8″ deep.

Foot stooge in use. Self explanatory. I use a 10:1 winder because I am too stupid to count in 15’s.
Gary Hinze
San Jose, California