Tag Archives: Tips

Adding an aileron to model plane

I was asked to clarify how to add an aileron to a Squirrel (or any stick and tissue model plane for that matter).

I use ordinary copy paper and cut out a rectangle or a tapered rectangle. Come think of it any shape will work as long as there is a long edge to attach to the wing.

20lb Copy paper is about right. I tried with tissue and it’s too light to keep it’s shape.

Scissors are best. In my example I actually used a hobby knife since I was in a cafeteria and I found my hobby knife before I found my scissors. 🙂

For a Squirrel I usually make the aileron about 3 inches long. I suppose 4 inches is good too. An inch wide is about right. In the example to the right I made it a little narrower than that.

If you have a glue stick you can put a thin layer along one of the long edges. I like a glue stick since you can probably easily remove the aileron if decide you don’t like it.

In the event you use white glue or craft glue be sure to use a toothpick or something to smear a thin layer along a long edge.
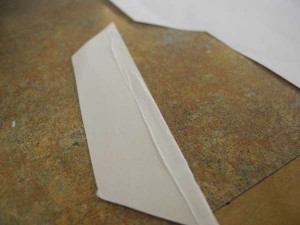
I used a bit much glue in the picture. But I was in a rush since I was about to do a flying session at a seniors residence.

You can then glue it to the trailing edge (back) of one of the wings. Any wing will work but I usually use the left. Most of my Squirrels turn right so I put it on the left and then bend it up a bit to bring the left wing down during flight.

Many people like having two ailerons. But I like just one. If it doesn’t work well enough I either make a bigger one or I make another one for the other wing.

Once you have an aileron (or two) on your airplane you can experiment bending them in different directions to affect the direction of flight.

If you have one I think it’s the easiest to start with.

But if you have two, there are a lot of options to try.

If you bend one up and one down, it will be twice as effective.

If you bend both down at the same time, then it is actually referred to as flaps or flap.  Flaps can reduce the speed of the airplane and is used for landing and takeoff for many airplanes.

If you bend both up it’s called spoilers. This is used for breaking and can be used just before landing as a way of bleeding of extra speed if the plane is travelling a little too fast.

For a Squirrel or any other simple stick and tissue model a single aileron can help get the airplane to go straight or in the right turn radius to suit your flying venue.

How an aileron works

An aileron on the left wing will raise the wing if it is bend downward (turning the plane right). It will drop the wing if you bend it up.

On the right wing it is the same except raising the wing will turn the plane left.

As a rule if you change the aileron setting of an airplane you need to change the pitch settings too. If you make the plane turn more then you need to make a pitch adjustment to raise the nose. If you make it turn less then the nose will raise so you need to make a pitch adjustment to drop the nose.

On a Squirrel the pitch is controlled by the wing position. To raise the nose move the wing forward. To drop the nose move it back.

Adjust aileron and pitch in small increments.


18 inch Squirrel

The original Squirrel instructions had a section on how to make a wing with a thick airfoil. I called it the “Alternate Wing” to emphasis the simpler wing.  The simple wing is just as efficient. The alternate one may be more stable though.

It has another section on how to make an 18″ wingspan version.

The 18″ version calls for the “alternate wing”.

Here’s what it said:

You can upgrade the Wing. Add a 1/16×1/8×12 stick as a “spar”. Glue it 1/3 of the way from the leading edge so that it braces the Winglets. Cover the top.

Or, when building, leave 3″ of extra tissue in front of leading edge and after adding the spar, wrap the tissue over the top and glue it to trailing the edge.

18″ Squirrel

Try an 18″ Squirrel. Use 1/8″ square for wing leading and trailing edge. 4″ chord and winglets, 9″ and 5″ stabilizers and an 18″x3/8×1/8 motor stick. I used the alternate wing (needed two pieces of 3/16 to get the height). I also needed a #16 elastic to attach the wing. At this point you may want to use a music wire motor hangar rather than a toothpick. Or just use a pair of toothpicks for more strength. Works well with wheels.

How to make your Squirrel fly very long or far

A Squirrel can fly quite well with simple hand winding.

Here is a nice flight from last summer that was done with hand winding.

Once you have your Squirrel tuned up nicely you can make it fly longer using the following techniques.

1) You can lubricate the rubber band. Get some Armor All from you nearest hardware store. After the elastic band is tied you can add a couple of drops to the rubber band. The trick is to take the elastic off the model then roll it around in your hand with the product.

This alone will allow the elastic band to take more winding. This reduces the friction on the surface of the elastic.

The elastic will also last longer.

2) You can use a mechanical winder to “stretch wind” the elastic. Here is a video of myself stretch winding a Squirrel. As you can see I have hooked the propeller onto a stationary “winding stooge”. I then take the knot end of the elastic and stretch it (it is still hooked onto the back of the propeller). The winder is used to wind up the elastic very quickly and as the tension builds up I am letting the elastic pull me in towards the model. Once it is wound up enough, I am unhooking the elastic from the winder and then hooking it onto the hook at the back of the model.

3) You can wind the elastic considerably more with these techniques. The rubber that comes with the Squirrel can take about 97 turns per inch before breaking if it is well lubricated and stretch wound. So if the elastic is 8 inches that comes to 776 turns. 9 Inches comes to 873 turns. You’ll want to use about 80 percent of the maximum since the rubber is stressed out quite a bit above 80 percent and will not last very long.

The Squirrel should also work well with an elastic that is as long as 15 inches. That’s a 30″ loop tied. That can accept 1455 turns.

Also a slightly thinner elastic will accept more turns (but it will not provide as much torque) for the propeller. You can shave some of the plastic off the flat surface of the propeller to make it lighter. Some of the motor stick can be removed sometimes as well to save weight. If you do all that you may be able to get the Squirrel to run on 3/32″ rubber instead of the 1/8″ standard. 3/32″ Rubber can take 129 turns per inch. So a 15″ loop can take 1935 turns.

4) If you don’t wait too long after winding I find it helps a bit sometimes as well.

5) In an indoor environment it helps if your plane has a gentle turn. As you can see in the video below it allows the plane to keep flying without hitting anything.

Lubricating the rubber to increase flight times

I find that the rubber will last longer and accept more winds if you lubricate it.

I’ve been using Armor All which is an automotive product. It works great. I’ve heard that  “son-of-a-gun” works well too.

After you tie the rubber band, add a few drops to the rubber band in your hand and squish it around to make sure the lubrication is everywhere except the knot.

Other things to explore:

I’ve heard of others using glycerin/soap mixture (two parts green soap, one part glycerin, and one part water and rub the mixture on the rubber band about an hour before).

I’ve also heard of people using castor oil. I’ve never tried it though.

The following has also been mentioned to me but I’m not sure about it: Silicon spray, Teflon spray, glycerin, ethylene glycol.

some kind of vinyl cleaner

Squirrel Airfoil

You can add a thick airfoil to your Squirrel with just one piece of balsa that is the same as the leading and trailing edge.

Here’s an old document that shoes an easy way of doing it.

In a nutshell you run a spar from winglet to winglet. You attach it to the front of the winglet so it braces the winglet. You cover the top and bottom of the wing with tissue.

You can notch it to go over the wing handle or remove the wing handle. It could be installed before the wing handle and then the wing handle sliced so one piece is ahead of the spar and the other is behind the spar.

Advantages:

-It strengthens the winglets by bracing them.

-It reduces wing warp.

Disadvantages:

-It’s more work.

-Nobody has proven the extra steps are worth it.